Wednesday, 1 November 2017

vSAN ESXi Host upgrade issues

Part 3 - vSAN ESXi Host upgrade issues


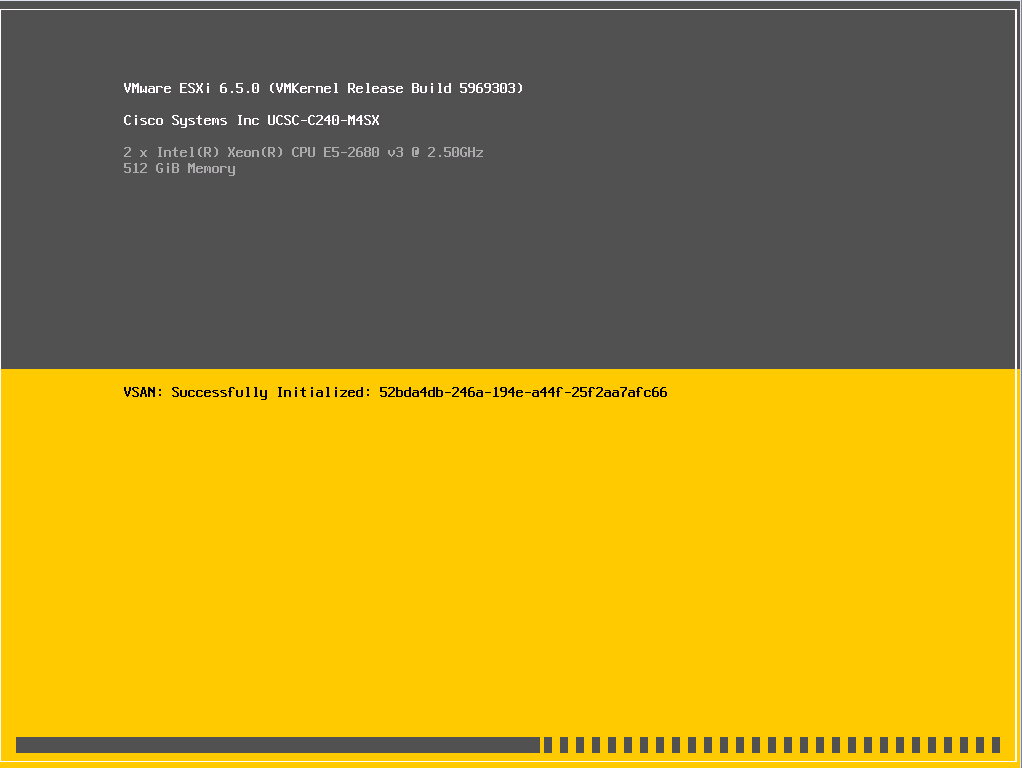
vSAN Host stuck during boot
If your esxi host reboots it gets stuck during boot process with below message.
VSAN: Successfully Initialized: xxxxx-disk group id-xxxxx-xxxx
This is expected behavior. At this stage of the reboot, the ESXi host (vSAN) processes all log entries to generate all required metadata tables.
The time taken to complete this task will depend on the load and the number of log blocks in the write buffer before the host was rebooted.
This step may take up to 2/4 hours to complete so just wait for it get finished.


ESXi Hosts Disks are missing after upgrade

Make sure ESXi Hosts can see all the disks and ESXi is contributing storage to vSAN Datastore.
You must install right driver of raid controller so that ESXi can see the storage disks.
If use OEM ESXi image, it will have the required drivers for your system.


vSAN ESXi Host Upgrade Using Update Manager


Part -2 vSAN ESXi Host Upgrade Using Update Manager

This post is part of step by step vSAN ESXi host upgrade process.

How to Upgrade vSAN ESXi Hosts
vSAN ESXi host upgrade is very time-consuming process. You should run health precheck tasks before upgrading each ESXi host. You can exclude hardware compatibility check once you are sure that your all servers are compatible with new version of vSAN/ESXi.
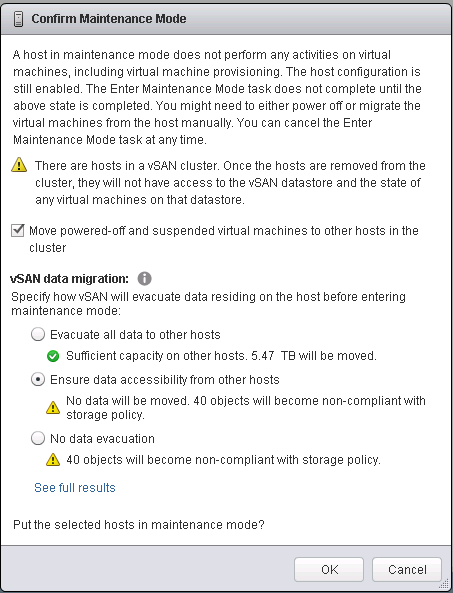
However, while putting host in Maintenance mode you need to select the vSAN data migration option.

vSAN host Maintenance Mode option

  1. Evacuate all data to other hosts – before host goes in Maintenance Mode all data from this host will be migrated to other hosts disks in the cluster, provided you have sufficient free capacity available. It will take some time migrate data to other hosts.
  2. Ensure data accessibility from other hosts – do not evacuate any data. Put host in Maintenance Mode, ensure data remain accessible from other hosts. VM objects will be unprotected.
  3. No data evacuation – No data evacuation, VM objects will be unprotected.  


Which Maintenance Mode option should I select for vSAN Host?

Try to answer below question to yourself to decide maintenance mode option.
  • How much critical data is it, Do I need to proactively rebuild data to other hosts?
  • Do you have enough free space to rebuild objects if one host fails?
  • How much time it will take to rebuild objects?
  • How much time it takes to evacuate all objects/data?
  • how long ESXi host will be down?


My Preference – I prefer second option, “Ensure data accessibility from other hosts” this is more useful and time saving. ESXi hosts would be back in couple of hours after patching, so no data rebuild or migration is required. Once ESXi hosts comes online it will rsync all objects. For some reason if ESXi host don’t come online then vSAN cluster will automatically start rebuilding objects to other hosts.


Vmware Update Manager Integration with vSAN


Vmware has integrated update manager with vSAN. Update manager automatically create and assign Update manager baseline to vSAN cluster as on when applicable patches gets released.
You can use this system defined patch/upgrade baseline or you can create your own patch baseline.
Once you upgrade one host, exit it from Maintenance Mode and run the health check again. Exclude hardware compatibility checks.
Make sure that vSAN health check plugin is not reporting any issues. If you notice Disk rebalance is happening wait for disk rebalance task to get completed before you start upgrading another host.
If you notice any issues after upgrading first host, fix those issue before proceeding with next host upgrade.
Once you upgrade one of the Host in vSAN cluster, vSAN Health plugin may report warning/errors related to vSAN advanced option mismatch or performance data. You can ignore these warning until you complete all Hosts upgrade.
But make sure you are not ignoring any warning/errors related to vSAN objects, disk usages, VM storage Policy compliance.

Next - Part 3 - vSAN ESXi Host upgrade issues

Tuesday, 31 October 2017

Part 1 - vSAN ESXI host Upgrade Precheck Tasks

This post is part of vSAN ESXi host upgrade process.


Follow below steps to perform precheck before you start upgrading ESXi hosts used for vSAN. for detailed information please refer VMware documents.


Login to vCenter web client.
Select vSAN cluster and go to Monitoring tab.
Select vSAN Tab, Click on Health 
Click on Retest and Retest with online health to test the health of vSAN cluster. 

Once Health check test completes, see if Cluster is reporting any warning or errors in Health plugin or under issues tab.

Login to Ruby vSphere Console (RVC) . Leave this session open, we will come back to it later.

Check for possible inaccessible objects and VMs in the cluster

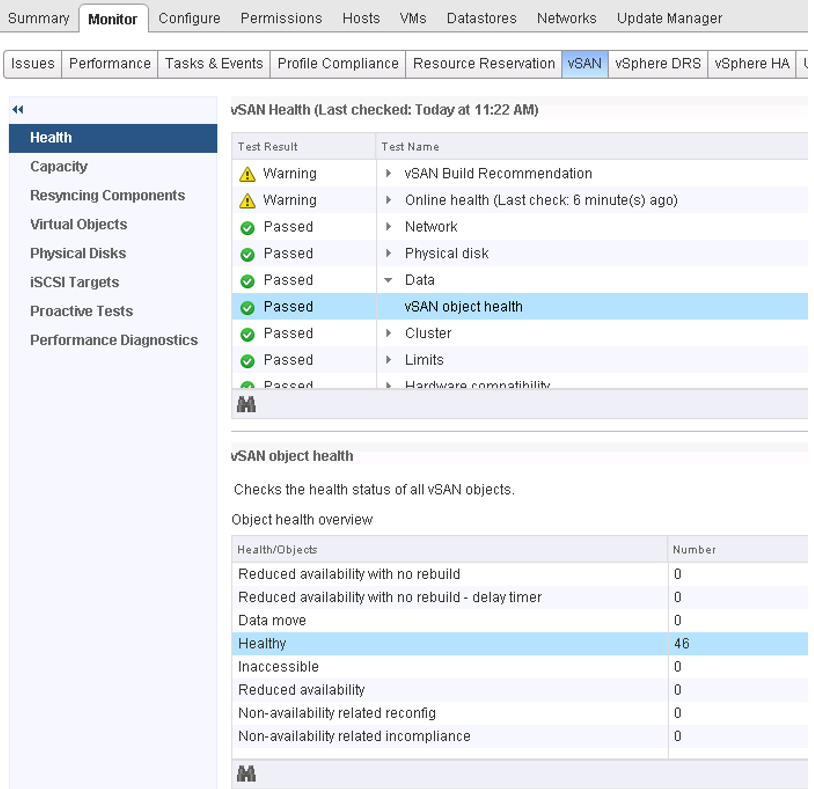
Under Health plugin, Click on Data and select vSAN object health.
In object health overview, all object should be healthy. If any object has non-zero value then fix the issue before proceeding with upgrade.

Check overall status of all objects

Use vsan.check_state command to get all object status.
/localhost/datacenter01/computers/ vsan01> vsan.check_state .
2017-10-17 15:39:18 +0000: Step 1: Check for inaccessible vSAN objects
Detected 0 objects to be inaccessible

2017-10-17 15:39:18 +0000: Step 2: Check for invalid/inaccessible VMs

2017-10-17 15:39:18 +0000: Step 3: Check for VMs for which VC/hostd/vmx are out of sync
Did not find VMs for which VC/hostd/vmx are out of sync

Virtual machine compliance status


Make sure all Vms are Complaint as per VM storage policy

Go to vSphere web client, select vSAN Cluster and VMs view. Make sure all VMs are compliant to VM Storage Policy.


How to test VM storage Policy Compliance?

From web client select VM and go to Monitoring tab.
Click on Green button to check compliance of VM with VM storage Policy.
If you see any errors or if any VM is not compliant with Policy then fix the issues before proceeding.

Check utilization of vSAN datastore

Make sure you have 30% free Space available on vSAN Datastore.  In case ESXi hosts fails during upgrade process then you should have enough capacity to rebuild components.

What if one Host fails?

From RVC console, see what capacity remains if one hosts fail.
/localhost/datacenter01/computers/vsan01> vsan.whatif_host_failures .
Simulating 1 host failures:
+-----------------+------------------------------+-----------------------------------+
| Resource        | Usage right now              | Usage after failure/re-protection |
+-----------------+------------------------------+-----------------------------------+
| HDD capacity    |  47% used (24442.63 GB free) |  56% used (16820.20 GB free)      |
| Components      |   1% used (53259 available)  |   2% used (44259 available)       |
| RC reservations |   0% used (0.01 GB free)     |   0% used (0.01 GB free)          |
+-----------------+------------------------------+-----------------------------------+


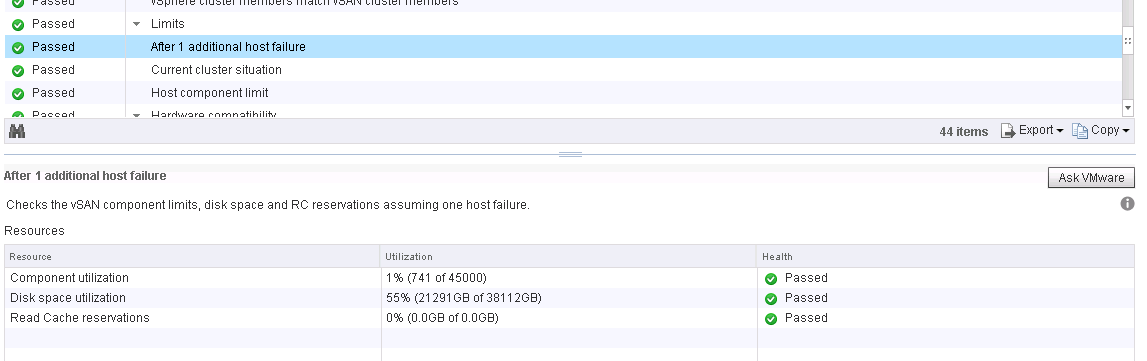
From Health Plugin Check Limits after 1 additional host failure.

Proactive Disk rebalances

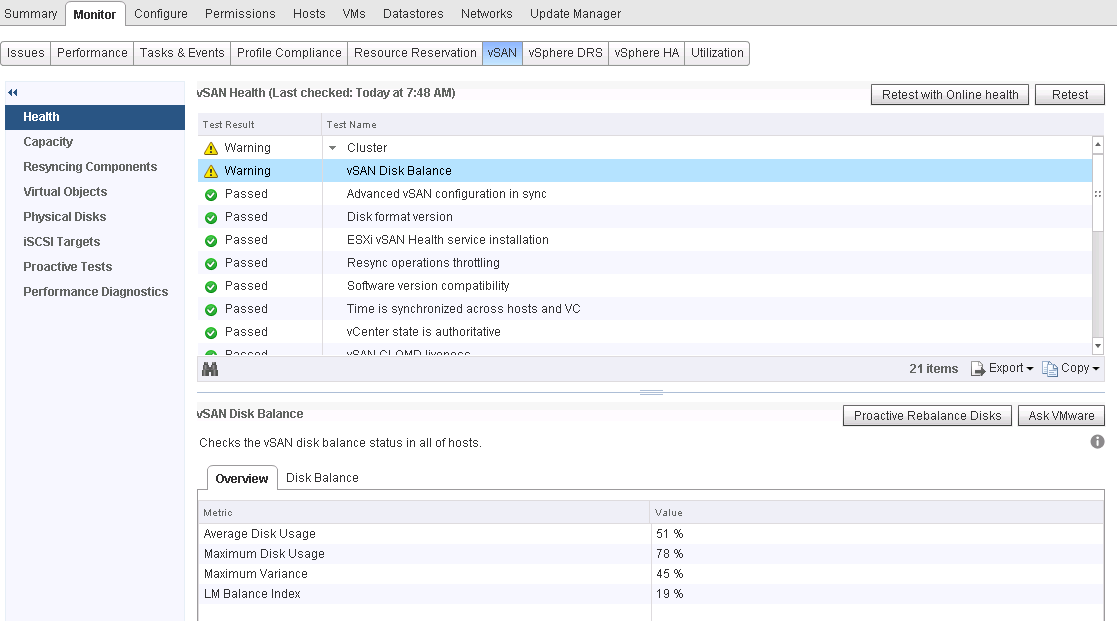
From vsan health plugin in web client see if any disks need to be rebalanced.
If Disk data rebalance is needed then do the proactive disk rebalance before starting ESXi upgrade.

Run vsan.proactive_rebalance_info  command to see if proactive disk rebalance is needed. If required run vsan.proactive_rebalance command to do the proactive disk rebalance. Proactive rebalance will take up to 24 hours to complete.

/localhost/datacenter01/computers/vsan01> vsan.proactive_rebalance_info .
2017-10-17 15:50:17 +0000: Retrieving proactive rebalance information from host dd-bld01-vsan01-04.d2d.mydomain.local ...
………………output truncated…….
Proactive rebalance is not running!
Max usage difference triggering rebalancing: 30.00%
Average disk usage: 47.00%
Maximum disk usage: 75.00% (62.00% above minimum disk usage)
Imbalance index: 34.00%
Disks to be rebalanced:
+----------------------+---------------------------------------+----------------------------+--------------+
| DisplayName          | Host                                  | Disk usage above threshold | Data to move |
+----------------------+---------------------------------------+----------------------------+--------------+
| naa.500a075112cbe790 | dd-bld01-vsan01-02.d2d.mydomain.local | 8.00%                      | 33.8774 GB   |
| naa.500a075112cbe785 | dd-bld01-vsan01-02.d2d.mydomain.local | 9.00%                      | 42.3468 GB   |
| naa.500a075112cbe779 | dd-bld01-vsan01-02.d2d.mydomain.local | 32.00%                     | 237.1421 GB  |
| naa.500a075112cbe309 | dd-bld01-vsan01-02.d2d.mydomain.local | 10.00%                     | 50.8162 GB   |
| naa.500a075112cbe2f5 | dd-bld01-vsan01-02.d2d.mydomain.local | 32.00%                     | 237.1421 GB  |
+----------------------+---------------------------------------+----------------------------+--------------+
………………output truncated…….

Check Physical Disk Utilization

From RVC console, run vsan.disks_stats . command to get all disks usages and health status.
If any disk is being used more than 80% then do the proactive disk rebalance.
e.g. Output.
/localhost/datacenter01/computers/vsan01> vsan.disks_stats .
2017-10-26 15:52:01 +0000: Fetching vSAN disk info from dd-bld01-vsan01-02.d2d.mydomain.local (may take a moment) ...
………………output truncated…….
2017-10-26 15:52:06 +0000: Done fetching vSAN disk infos
+----------------------+---------------------------------------+-------+------+-----------+---------+----------+------------+----------+----------+------------+---------+----------+---------+
|                      |                                       |       | Num  | Capacity  |         |          | Physical   | Physical | Physical | Logical    | Logical | Logical  | Status  |
| DisplayName          | Host                                  | isSSD | Comp | Total     | Used    | Reserved | Capacity   | Used     | Reserved | Capacity   | Used    | Reserved | Health  |
+----------------------+---------------------------------------+-------+------+-----------+---------+----------+------------+----------+----------+------------+---------+----------+---------+
| naa.500a075112c9eaca | dd-bld01-vsan01-01.d2d.mydomain.local | SSD   | 0    | 558.91 GB | 0.00 %  | 0.00 %   | N/A        | N/A      | N/A      | N/A        | N/A     | N/A      | OK (v3) |
| naa.500a075112cbe775 | dd-bld01-vsan01-01.d2d.mydomain.local | MD    | 7    | 846.94 GB | 56.34 % | 24.21 %  | 3387.74 GB | 56.34 %  | 7.03 %   | 8942.50 GB | 8.98 %  | 2.29 %   | OK (v3) |
| naa.500a075112cbe7b8 | dd-bld01-vsan01-01.d2d.mydomain.local | MD    | 6    | 846.94 GB | 56.34 % | 1.31 %   | 3387.74 GB | 56.34 %  | 7.03 %   | 8942.50 GB | 3.61 %  | 0.12 %   | OK (v3) |
| naa.500a075112cbe77e | dd-bld01-vsan01-01.d2d.mydomain.local | MD    | 8    | 846.94 GB | 56.34 % | 1.31 %   | 3387.74 GB | 56.34 %  | 7.03 %   | 8942.50 GB | 11.51 % | 0.12 %   | OK (v3) |
| naa.500a075112cbe77d | dd-bld01-vsan01-01.d2d.mydomain.local | MD    | 7    | 846.94 GB | 56.34 % | 1.31 %   | 3387.74 GB | 56.34 %  | 7.03 %   | 8942.50 GB | 11.48 % | 0.12 %   | OK (v3) |
+----------------------+---------------------------------------+-------+------+-----------+---------+----------+------------+----------+----------+------------+---------+----------+---------+
………………output truncated…….

VM Backups


As a best practice make sure you have backup copies of Vms/data. In real life, it may not be possible to backup all VMs, however you should have backups of critical VMs.

Hardware Compatibility 


Check if Server hardware does support new ESXi and vSAN version. All server components should be on ESXi and vSAN HCL. Make sure you have required firmware’s and drivers installed.
Check and Verify Current Driver and firmware for I/O controller, Disk Firmware (Cache and capacity) and network card drivers and firmware.

List ESXi SCSI Devices

Login to ESXi host using SSH and run esxcfg-scsidevs -a command get all scsi devices.
[root@dd-bld01-vsan01-01:~] esxcfg-scsidevs -a
vmhba0  fnic              link-n/a  fc.20000025ef98a005:20000025ef9aa005    (0000:0a:00.0) Cisco Systems Inc Cisco VIC FCoE HBA Driver
vmhba1  ahci              link-n/a  sata.vmhba1                             (0000:00:1f.2) Intel Corporation Wellsburg AHCI Controller
vmhba2  fnic              link-n/a  fc.20000025ef98a005:20000025ef9bb005    (0000:0b:00.0) Cisco Systems Inc Cisco VIC FCoE HBA Driver
vmhba3  megaraid_sas      link-n/a  unknown.vmhba3                          (0000:03:00.0) LSI / Symbios Logic MegaRAID SAS Invader Controller
vmhba32 usb-storage       link-n/a  usb.vmhba32                             () USB
vmhba33 ahci              link-n/a  sata.vmhba33                            (0000:00:1f.2) Intel Corporation Wellsburg AHCI Controller
vmhba34 ahci              link-n/a  sata.vmhba34                            (0000:00:1f.2) Intel Corporation Wellsburg AHCI Controller
vmhba35 ahci              link-n/a  sata.vmhba35                            (0000:00:1f.2) Intel Corporation Wellsburg AHCI Controller
vmhba36 ahci              link-n/a  sata.vmhba36                            (0000:00:1f.2) Intel Corporation Wellsburg AHCI Controller
vmhba37 ahci              link-n/a  sata.vmhba37                            (0000:00:1f.2) Intel Corporation Wellsburg AHCI Controller

Get raid controller driver version


[root@dd-bld01-vsan01-01:~] vmkload_mod -s megaraid_sas | grep Version
Version: Version 6.606.06.00.1vmw, Build: 1331820, Interface: 9.2 Built on: Nov 26 2014


Get the Device Vendor ID

In below example vmhba3 is my raid controller device.
Get the Vendor ID (VID), Device ID (DID), Sub-Vendor ID (SVID), and Sub-Device ID (SDID) using the vmkchdev command.
[root@dd-bld01-vsan01-01:~] vmkchdev -l | grep vmhba3
0000:03:00.0 1000:005d 1137:00db vmkernel vmhba3

Check Vmware vSAN Compatibility

With above information in hand, visit Vmware hardware compatibility page to see if your device is compatible with vsan / esxi or not.
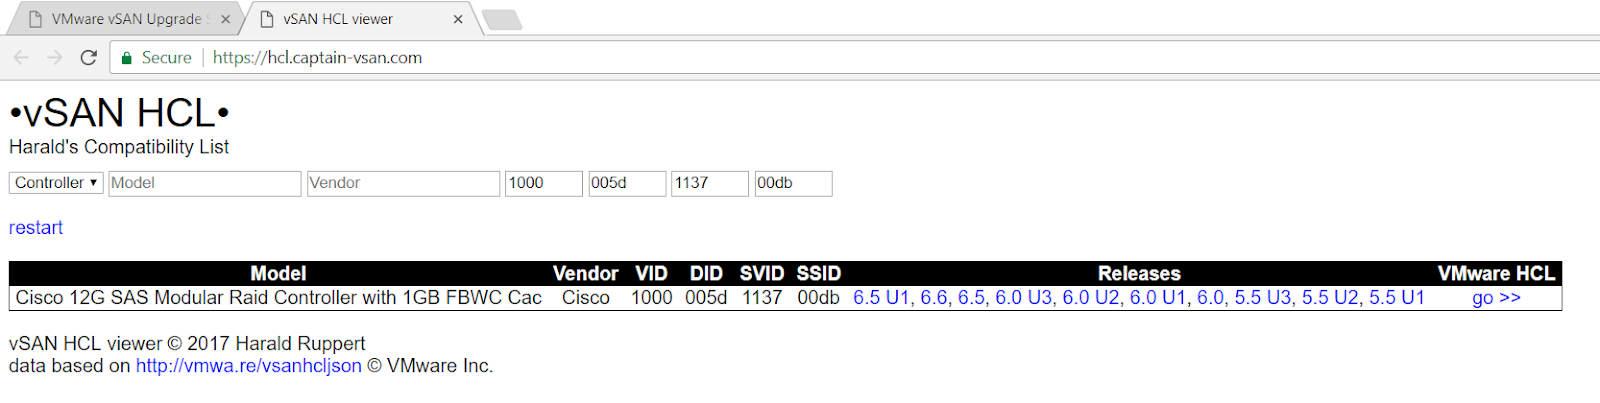
Easiest way to perform hardware compatibility check is using cpatin-vsan.com site.  
Visit https://hcl.captain-vsan.com/ Enter VID, DID, SVID, SDID and click on go, this will redirect you to VMware’s vSAN compatibility information URL for this Device.
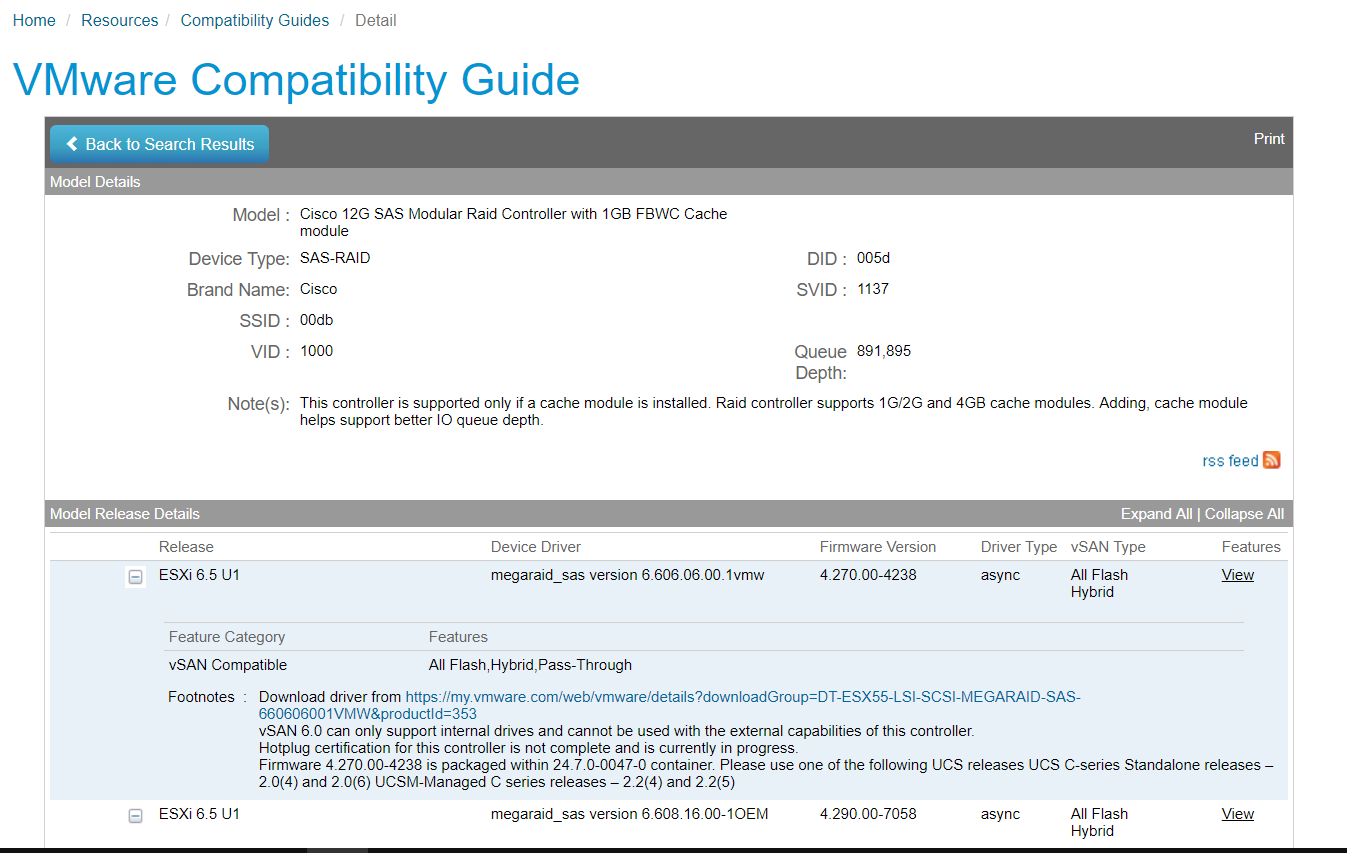
As per below images, Cisco 12G SAS Raid controller is supported with ESXi 6.5u1 and other versions.


As per Vmware Compatibility Guide, Cisco 12G SAS Raid controller is supported by vSAN All Flash and Hybrid configuration. Also, you can see the support Device drivers and firmware version.  

Disk Firmware Check

Verify the current Firmware against the drives in use for vSAN, if they also need any upgrade

[root@dd-bld01-vsan01-01:~] esxcli storage core device list | egrep 'Display Name:|Size:|Model:|Revision:'
  Display Name: Local ATA Disk (naa.500a075112cbe774)
  Has Settable Display Name: true
  Size: 915715
  Model: MICRON_M510DC_MT
  Revision: 0013
  Queue Full Sample Size: 0
……output truncated…………….


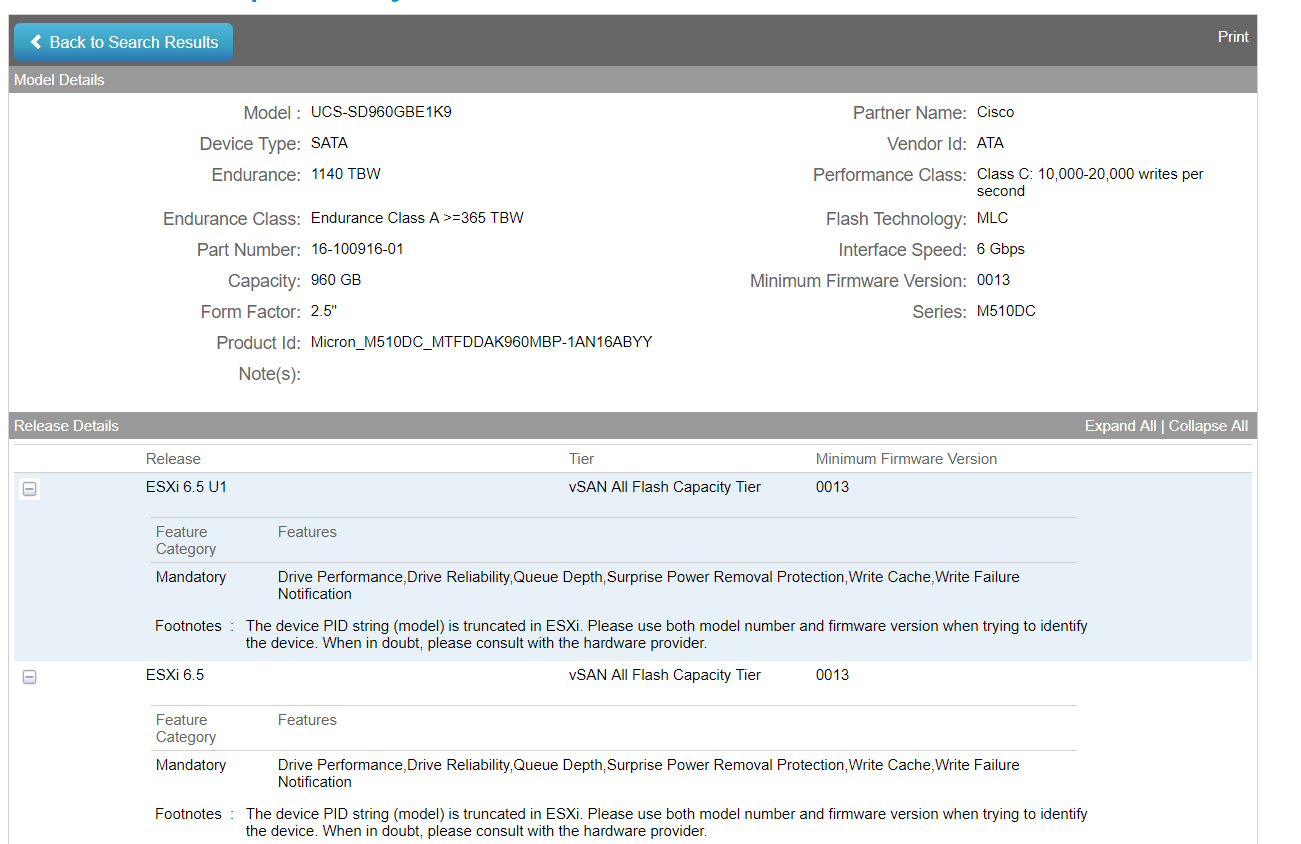
Note down the Disk model and visit Vmware HCL site to find if this type of disks is compatible with
vSAN/ESXi version to which you are upgrading ESXi hosts. Visit VMware HCL site.


As per below Image Cisco Disks is compatible with vSAN All Flash.

vSAN default repair delay ClomRepairDelay

Change vSAN default repair delay ClomRepairDelay settings from 60 minutes to 120 or 180 minutes. So that during ESXi upgrade process vSAN do not start object rebuild process.
This VMware vSAN advanced setting specifies the amount of time vSAN waits before rebuilding a disk object after a host is either in a failed state or in Maintenance Mode. By default, the repair delay value is set to 60 minutes; this means that in the event of a host failure, vSAN waits 60 minutes before rebuilding any disk objects located on that particular host. This is because vSAN is not certain if the failure is transient or permanent.
In this case, as we know Host is down due to upgrade process so we just don’t want object rebuild process to kick in.
Follow above KB article to change ClomRepairDelay value.
Also, you can do below steps
Using SSH Login to each ESXi hosts which is part of vSAN Cluster.
Run below command to set required value and restart clomd service.
#esxcli system settings advanced set -o /VSAN/ClomRepairDelay -i 120 ; /etc/init.d/clomd restart ; date
with this settings vSAN will not try to rebuild vsan objects for 120 minutes.
Once you complete upgrading all Hosts, reset above value to default 60 minutes.